
Since in the introduction of Bitcoin and the explosion of crypto currencies has created quite a lot of attention around the concept of Blockchain. In this post I will try to explain the concept by implementing Pychain, a toy Blockchain, in about 200 lines of Python.
What is Blockchain?
Wikipedia defines Blockchain as
A blockchain, originally block chain, is a growing list of records, called blocks, which are linked using cryptography.
If we simplify this a little further for easier understanding, we can define Blockchain as a Linked List of Blocks. In a traditional Linked List each node points to its succeeding node. However in Blockchain, each Block points to its preceding Block.
Just another Block in the chain
Continuing with our Linked list analogy, each block each block must contain meta data to validate the integrity of the chain. In Pychain we include on the most necessary: index, nonce, timestamp, data, previous hash, and hash.
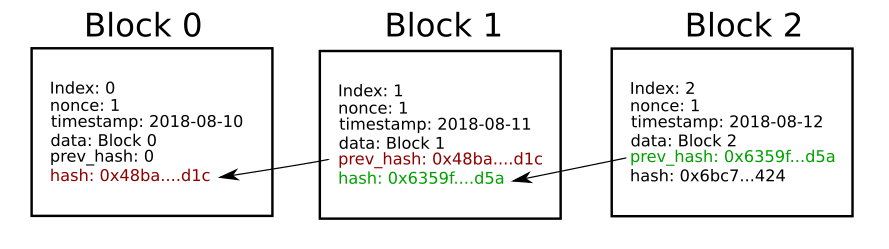
Most of the attributes are self explanatory, except of nonce. We will discuss about a little bit later.
class Block:
    def __init__(self, index, nonce, prev_hash, timestamp, data, hash):
        self.index = index
        self.nonce = nonce
        self.prev_hash = prev_hash
        self.data = data
        self.timestamp = timestamp
        self.hash = hash
Hash
Each block being added into the chain is validated by calculating the hash. SHA-256 in Pychain. The way hash is calculated is take all the fields (index, nonce, timestamp, data, and previous hash) and calculate SHA-256 sum.
import hashlib
def calculate_hash(index, nonce, timestamp, data, prev_hash):
    block_val = str(index) + str(nonce) + prev_hash + str(timestamp) + data
    return hashlib.sha256(block_val.encode("utf-8")).hexdigest()
The process of calculating the hash is defined as " Mining" in bitcoin and other crypto currencies. If it were this simple, then validity of the chain can compromised very easily. To make it difficult to compromise each miner has to spend some time and money “working”. This is called “Proof of Work”.
Proof of Work
SHA-256 is always 256 bits or 64 bytes long no matter how long the input is. For example hash for text, “Hello, Pychain”, it is 368fd26488e3fda58ec81fc5bdc0ea6b919526f765cfddc315fb1d81b9793649.
$ echo Hello, Pychain | sha256sum
368fd26488e3fda58ec81fc5bdc0ea6b919526f765cfddc315fb1d81b9793649 -
Computing this hash hardly takes any effort. To increase the effort needed to mine a block, Bitcoin arbitrarily choose certain number of digits in the hash to be zeros. At the time of writing this post Bitcoin expects the first 18 digits of the hash to be zeros. For a given input, SHA-256 will always compute the same hash. This is where the field " nonce" defined in our block comes to picture.

For our Blockchain, we will set the default “difficulty” to 4, but while running this value can be set to whatever we want.
import hashlib

difficulty = 4
pattern = '0000'

def calculate_hash(data_to_hash):
    return hashlib.sha256(data_to_hash.encode("utf-8")).hexdigest()

def mine_block(index, prev_hash, timestamp, data):
    for nonce in range(1, maxNonce):
        blockVal = str(index) + str(nonce) + prev_hash + str(timestamp) + data
        hash = calculate_hash(blockVal)
        if hash[:difficulty] == pattern:
            return Block(index, nonce, prev_hash, timestamp, data, hash)
Adding a new Block
Now that we have some basic infrastructure in place we can start adding blocks to Pychain. To mine a new block we need a information about the previous block and we compute the rest of the fields, index, time stamp. Data is provided by the end user.
def add_block (data):
    prev_block = get_last_block()
    timestamp = time.time()
    new_block = mine_block(prev_block.index + 1, prev_block.hash, timestamp, data)
    return new_block
Genesis Block
If we need the previous block to add a new block, how do we kick start the chain? This chicken and egg problem is solved by what is called the “Genesis Block”. This is a special kind of block with previous hash set to all zeros. Pychain generates this block like this.
def mine_genesis_block ():
    timestamp = time.time()
    return mine_block(0, "0", timestamp, "Genisis Block")
In a real world Blockchain, genesis block is computed only once.
Storing the Blocks
As the number of blocks grow, we need a way to persist the historical block. Pychain does not have persistence, we will store them as a in-memory array.
def mine_genesis_block ():
    timestamp = time.time()
    return mine_block(0, "0", timestamp, "Genisis Block")

chain = [mine_genesis_block()]
Authenticity of a Block
So far Pychain has been single node Blockchain. Although it is a valid chain, it does not serve much of a purpose. When we have multiple peer nodes in the network we need to way to validate if the new Block being added to the chain is authentic. Each node upon receiving a new Block will try to validate the block. Only valid Blocks will be added to the chain.
def is_block_valid(next_block, last_block):
    if last_block.index + 1 != int(new_block["index"]):
        return False
    if last_block.hash != new_block["prev_hash"]:
        return False
    block_val = str(new_block["index"]) + str(new_block["nonce"]) + new_block["prev_hash"] + \
      str(new_block["timestamp"]) + new_block["data"]

    if calculate_hash(block_val) != new_block["hash"]:
        return False
    return True
Longest chain wins
Real world Blockchain implementations will trust the chain with the maximum work done, or in other words the longest chain always wins. This way as the chain grows, it becomes harder and harder to manipulate the chain. For an attacker to take over the blockchain has to mine all the blocks since the “fraudulent” block and be faster than 51% of all the nodes in doing so. For the sake of simplicity, Pychain only verifies if the index of the new Block is greater than the previous known block and the new block passes the validation.
Peer to Peer Protocol
All Blockchain implementations have a protocol to communicate between peers. Pychain has a bare bones protocol to achieve this. Websockets are used to communicate with other peers in the network. Pychain supports only two “commands”, QUERY_ALL and NEW_BLOCK.
Whenever a new node joins the network, it will try to ask one of its peers for the current state of the Blockchain using the QUERY_ALL command. If a new block is mined by this node it will send out a broadcast message to all the peers it is aware of with a NEW_BLOCK command. When a node receives a NEW_BLOCK message it will follow the block authentication process and decide to add the block or discard the block.
Manage the node
Each Pychain node will also expose a HTTP endpoint to allow for end user interaction.
class HttpHandler(BaseHTTPRequestHandler):
    def do_GET(self):
        if self.path == '/blocks':
            self.set_response_headers(200)
            self.wfile.write(bytes(json.dumps(chain, default=jdefault), "utf8"))
        elif self.path == '/peers':
            self.set_response_headers(200)
            self.wfile.write(bytes(json.dumps(peers), "utf8"))
        else:
            self.set_response_headers(400, "plain/text")
            message = "Bad request"
            self.wfile.write(bytes(message, "utf8"))
        return
    def do_POST(self):
        length = int(self.headers['Content-Length'])
        post_body = json.loads(self.rfile.read(length))
        new_block = add_block(post_body["data"])
        send_broadcast(new_block)
        self.set_response_headers(201)
        self.wfile.write(bytes(json.dumps(new_block, default=jdefault), "utf-8"))
    def set_response_headers(self, code, content_type="application/json"):
        self.send_response(code)
        self.send_header("Content-type", content_type)
        self.end_headers()
# get all blocks known to this peer

$ curl http://localhost:6001/blocks
Finally
Working code for Pychain can be found here. Pychain is a simplified implementation of Blockchain to help understand the concept, and it is not suited for anything other than that.